Громадянська відповідальність на уроках англійської мови (Урок)

Lesson 1
This is what I like
I am a boy/I am a girl and what I like and do is okay
Learning objectives The students discover their own and others’ abilities and knowledge.
They become aware of the effects of gender stereotypes.
Student tasks The students write down their own preferences and behaviour in
four categories. They share their answers with other students and
refl ect on them.
Resources Paper and pens, printed copies of the handout (“I like and I do”
table).
Methods Individual and group work, plenary discussion.
Lesson description
The teacher introduces the topic by asking questions such as “What activities do you like doing?”,
“What activities don’t you like doing?”, “What activities are done by girls?” and “What activities are done by boys?” The teacher waits for the students to think about possible answers and then acknowledges their answers.
As a second step, the teacher gives the students a copy of the handout, paper and pens. The students have to fold the handout in half and use only the top part of it for the moment. The teacher then gives the following instructions to the students:
– Write down whether you are a girl or a boy.
– Write down five things you like doing and do.
– Write down five things you do but don’t like doing.
– Write down five things you don’t like doing and don’t do.
– Write down five things you don’t do but would like to.
Indicate next to each thing you wrote down whether you think it is okay for your sex to do it (if you are a boy, whether this is okay for a boy to do, if you are a girl, whether this is okay for a girl to do).
When the students have finished, the teacher asks them to walk around the class and share their answers with five other students. They record these students’ answers on the bottom part of the handout.
The teacher asks the students to come together and sit in a circle. A plenary discussion then takes place using the following questions as a starting point:
– What do you think of your classmates’ answers? Were you surprised?
– What are the things that only you can do?
– Which of the things your classmates do impressed you most?
– Do you see any common ideas in the things that students like doing but don’t do?
– What happens if a girl does boys’ things? Or if a boy does girls’ things?
– How would your family members answer the questions?
– Why do we answer the way we answer? Why do we think that some things are only okay for girls to do and some are only okay for boys to do?
As a last step, relate the questions to issues of EDC and HRE:
– What happens if someone doesn’t know about the things you like doing and do?
– What happens if someone doesn’t know about the things you don’t like doing but do?
– Who decides what a girl can do and what a boy can do?
– What happens if what boys and girls can do is restricted?
– Do you think that the roles will stay as they are? Was it always like this?
Extension: the lesson can be extended by focusing on the question of what students don’t do but would like to do. The teacher tries to find solutions together with the students on how these things could be tried out in the classroom context.
Lesson 2
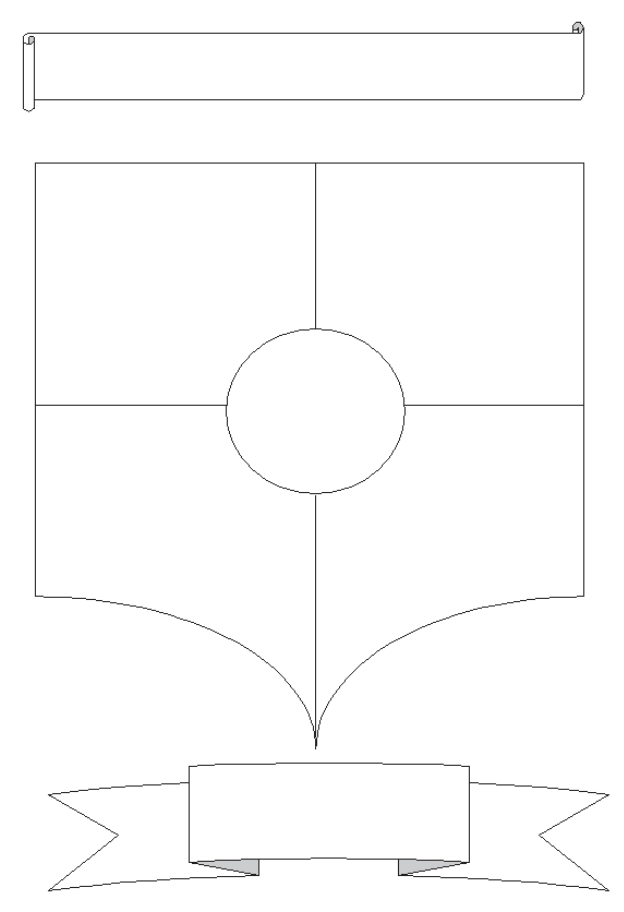
My personal symbols (coat of arms part I)
This is what I am
Learning objectives The students enhance their self-esteem by recognising and valuing their positive aspects.
Student tasks The students create their personal symbols which will be part of a
group coat of arms. They ask themselves questions about their own
perception of themselves and use the strengths identified in lesson
1. The students form groups as a pre-requisite to lesson 3.
Resources Tables from the previous lesson, printed copies of the coat of arms
(two per student), coloured pens, scissors.
Methods Individual work, forming of groups.
Information box
In European tradition, a coat of arms, more properly called an armorial achievement, armorial bearings or often just arms for short, is a design belonging to a particular person (or group of people) and used by them in a wide variety of ways. Historically, coats of arms were used by knights to be able to tell them apart from enemy soldiers. In Continental Europe commoners were able to adopt burgher arms. Unlike seals and emblems, coats of arms have a formal description
that is expressed as a blazon. In the 21st century, coats of arms are still in use by a variety of institutions and individuals (for example several universities have guidelines on how their coats of arms may be used in order to protect their use).
The art of designing, displaying, describing, and recording arms is called heraldry. The use of coats of arms by countries, states, provinces, towns and villages is called civic heraldry.
Lesson description
1. The second lesson starts by forming the students into groups of four. It is recommended to form the groups using a group-forming game, such as handing out matching cards in sets of four or pictures in sets of four, etc. The students’ task is to fi nd their other partners and form the group.
2. Next, the students should sit together in their groups. Each student receives a printed copy of the coat of arms. Another copy of the coat of arms is placed in the middle of the table. There are four sections on the coat of arms and the students should select one section each. They should write their names in pencil on the copy in the middle of the table. On their own copy, they should start cutting out their personal piece of the coat of arms.
3. The teacher should then ask the students to think about what personal symbols they could use to represent themselves. “This is what I am” should be the motto for this task. The extended message of this task could be “This is what I bring to the group”. For this, the teacher should ask the students to take out the tables they produced in lesson 1. They can get some ideas from the columns “I like doing and do” and “I don’t do but would like to”. They now have to find symbols that represent their strengths to draw into their section. The following questions could be of help:
– How do you perceive yourself?
– What do you need?
– What are you capable of doing?
– What do you regret when you think about your life?
Lesson 3
This is our coat of arms (coat of arms part II)
We are strong as a group because we are individuals
Learning objectives The students become aware of the potential of their individual strengths that they bring to a group. They agree on a name and
motto for the group.
Student tasks In groups of four, the students explain their personal symbols to
the other members of the group. They create a joint coat of arms and agree on a name, a motto and a common symbol for it. The students present their coats of arms to the class.
Resources Copies of the coat of arms from the previous lesson, coloured pens,
glue.
Methods Group work (in fours) and group presentation.
Lesson description
Continuing from lesson 2, the students discuss the symbols they have produced and share their thoughts. The teacher then asks the students to perform the following tasks:
– Explain your symbol(s) to your group members;
– Glue all parts of the symbol(s) onto your coat of arms;
– Find a common symbol for your group (centre), a motto for your ideas (top flag) and a name for your group (bottom flag).
The teacher should tell the students that decisions have to be made together in order that everyone can identify with the decision.
The completed coats of arms are then presented to the plenary session by a group member and are displayed alongside everyone else’s on the wall.
про публікацію авторської розробки
Додати розробку