Матеріали для організації мовного табору
Програма табору розрахована на два тижні активної діяльності учнів. Кожний день присвячений роботі за окремою тематикою. Процес вивчення мови в такому літньому таборі відбувається під час ігор на свіжому повітрі, під час роботи над проектом, науковим експериментом чи дослідженням. Таким чином, англійський табір дасть можливість дитині зануритися в природне мовне середовище на цілих п'ять годин щодня.

Create a Flip Book!
Trick your eye with this funky flip book project! If you've ever wondered how animators get your favorite cartoons to look like they're moving (even though they're just drawings) this is the activity you've been waiting for. You can easily create your own hand held animation by making a flip book, a book with different pictures on each page so when you flip through them they look like they're moving! It's fun, easy, creative... and even teaches a little about science!

Grade Middle School
Subject Science
Life Science
- Arts & Crafts
- Paper & Glue Crafts
What You Need:
- Small notepad or pad of post-its (it helps if the paper is thin enough to allow you to see the previous drawing)
- Pencil
- Patience and imagination
What You Do:
- Brainstorm about what to draw. Keep it simple! A bouncing ball, moving butterfly, or a stick figure waving or skipping rope are all fun and easy to do.
- Open the notepad to the last page, and draw the first picture there. You may want to start with the object on the right edge, only partly showing like it's peeking through or moving into the "frame."
- From there, work your way "up" by turning to the next sheet (the second from the bottom). Draw the next picture slightly different than the first, as if you were watching it move in slow motion.
- Continue with a slightly different image moving slowly across each page until you've finished the flip book.
- Now, flip the book from back-to-front and watch the action! When single drawings are flipped quickly, the eyes can't keep up so even though you're not looking at the drawing anymore, the eye projects the image onto the brain for a moment longer. This experience is called persistence of vision, and it's why your flip book drawings look like they're moving!
Make Your Own Zine
Creating a zine is a fantastic way for your teen to embrace her passion about a topic while honing key organizational, research, and writing skills. In this guide, create create a 24-page, 8.5" x 5.5" zine with your teen, complete with title, cover art, and tons of creative content!
Grade Middle School
Subject Arts & Crafts
- Paper & Glue Crafts
What You Need:
- Selection of old magazines and newspapers
- Blank 8.5 x 11" pages for the zine and for branstorming
- Scissors
- Glue
- Stapler
- Found items (i.e. magazine cilppings, newspaper articles, pictures, photos, etc.) related to the zine topic
- Markers, pens, and pencils or computer and printer
What You Do:
1. Outline the zine. Once your teen has chosen a zine topic, work with her to outline a list of subtopics for the content. Use the cluster method to brainstorm 10 to 12 subtopics. To cluster, have your teen write the zine topic in the middle of a page and circle it. For the next five minutes, jot down any associated words that come to mind. When time is up, you and your teen can review the words and connect the strongest ideas to the topic. For instance, if your teen is writing about her favorite sport, think about what kinds of sports issues, equipment, people, or aspects of the game she'd like to talk about.
2. Get organized. Copy the subtopics into a list, and beside each one write down what type of content it should be. Possible content types include articles, interviews, creative writing (poetry and short fiction), drawings and other art, photos, charts, comic strips, or anything else you can imagine. This list will also serve as a checklist as you and your teen complete content for the zine.
3. Create the content. With the checklist handy, divide the content into three general categories: written items, illustrated items, and found items (i.e. magazine clippings). Allocate the content, making sure that each of you works on activities from every category. Written content can be handwritten or typed if you have access to a computer and printer. Use blank 8.5 x 11" paper to create content, but remember to consider the size of the zine (8.5 x 5.5") when writing. Once you've completed an item, cut it to out and set it aside. For "found" items, look through old magazines or newspapers for images that will enhance the zine. Keep in mind that if you want to make multiple copies of the zine, images will be in black and white. Cut these out and set them aside.
4. Put it all together.
- Fold six sheets of 8.5 x 11" paper in half horizontally to create a book that measures 8.5 x 5.5". The zine will be 24 pages long (one sheet yields four zine pages), including the front and back covers.
- Using glue, place each content item into the desired location in the zine, reserving the front page for your zine title, name, and cover art. Once everything is glued down, let it sit for an hour to dry.
- If you're making multiple copies of your zine, photocopy each page and collate the pages in separate stacks. Staple each stack on the crease, using three staples to make sure it's secure. Fold the pages over.
Voila! Your zine is complete!
Did You Know?
Local bookstores often carry zines and other small journals. Encourage your teen to bring copies of her zine to an independent local bookstore—it might just end up on the shelves!
Forms of Energy for Kids
Energy is the ability to change or move matter, and matter is everything that takes up space. Without energy, the world could not function! Here is a practical way to demonstrate specific forms of energy that's also completely kid-friendly!
Grade Middle School
Subject Science
Physical Science
Offline Games
- Outdoor Games
- What You Need:
- Bicycle
- Various household items
- Various classroom items
What You Do:
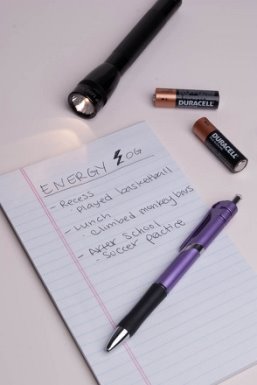
- Have your child find and write the definition of energy and the different forms of energy: chemical, mechanical, radiant, electrical, and nuclear. By doing the research himself, he’ll be taking the lead in the experiment—always a good skill to foster.
- Go outside and have your child position himself on a bicycle. Ask him what he needs to do in order to make the bike move. He should respond that he needs to push the pedals with his feet. Then, ask him what happens to the bike when he does this. He should respond that the tires begin to turn and move the bike. Try it out to use a little energy!
- Have him look at his definitions of the forms of energy. Which one applies to his feet pushing the pedals which in turn move the bike? He should respond by identifying mechanical energy. His legs transfer mechanical energy to the pedals, which transfer the energy to the tires. The tires move the bike from one place to another!
- Have your child look at his definitions of the forms of energy again. Ask him to look around the house and find something that can demonstrate another form of energy. For example, a toaster takes electrical energy running through the wire and heats up the elements which in turn toast the bread. Or on a sunny day, sit near a window placing your arm next to the window; after a few minutes your arm will be warm because the radiant energy from the sun is transferred through the window onto the arm, which makes it feel warm. Want an example of chemical energy? Look no further than the 4th of July! If you have ever seen a fireworks display, it's an awesome example of the change that takes place in chemical energy; it changes into light, which you see from below.
Extension Activity:
Have your child create an “energy” log. For one entire day, he must write down everything he does that requires energy. Remember that the human body uses energy to think and move!
Classroom scavenger hunt – consult the teacher and see if he or she would like to participate by having the kids hunt for all types of energy being used in the classroom.
In the Air and All Around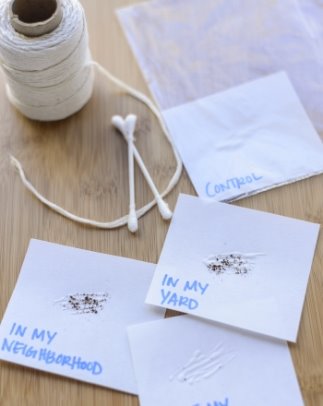
Ecology
Material Availability
Readily available or easily purchased at the grocery store
Approximate Time Required to Complete the Project
Three days to collect the data; one additional day to prepare the chart
To investigate the local air quality
- 4 blank white index cards
- 4 pieces of string about 8 inches in length
- Pen
- Petroleum jelly
- Cotton swab
- Small re-closeable plastic bag
- Magnifying glass
Since the beginning of the Industrial Age, air pollution has been a problem. Cars and factories add to our quality of life, yet take away from our quality of air.
In this investigation, local air quality is analyzed.
Terms allergens: any substance that causes an allergic reaction; common allergens in our environment include pollen, dust, and grass
pollution: harmful substances in the air
Concepts
Some allergens in the air are natural such as pollen, grass, and dust. Pollution is caused by unnatural substances in the air such as smoke. Both allergens and pollution affect the quality of air and how people breath.
Research Questions
- What causes allergens in the air?
- What allergens are in the air we breathe?
- Do some places have more allergens than other places?
- What health problems do allergens cause?
- Gather the necessary materials.
- Tape a piece of string to each of the index cards so that the cards can be hung in different places.
- Label the four cards: “Inside My House,” “In My Yard,” “In My Neighborhood,” and “Control.”
- Using the cotton swap, spread a thin layer of petroleum jelly one side of each card.
- Hang the first card somewhere in the inside of your house, the second card in your yard, and the third card somewhere in your neighborhood. Hang them somewhere where they will not be disturbed for three days. Place the “Control” card inside the re-closeable plastic bag.
- After three days, gather the index cards. Use the magnifying glass to examine the cards for signs of allergens and pollution. Compare the cards to the “Control” card. Record your findings.
Articles
“Ozone, Air Quality, and Asthma” at http://kidshealth.org
http://www.clean-air-kids.org.uk/airquality.html
http://www.epa.gov/kids/air.htm
Nancy Rogers Bosse has been involved in education for over forty years à first as a student, then as a teacher, and currently as a curriculum developer. For the last fifteen years she has combined a career in freelance curriculum development with parenthood à another important facet of education and probably the most challenging. Nancy lives in Henderson, Nevada with husband and their three teenagers.
Disclaimer and Safety Precautions
Education.com provides the Science Fair Project Ideas for informational purposes only. Education.com does not make any guarantee or representation regarding the Science Fair Project Ideas and is not responsible or liable for any loss or damage, directly or indirectly, caused by your use of such information. By accessing the Science Fair Project Ideas, you waive and renounce any claims against Education.com that arise thereof. In addition, your access to Education.com's website and Science Fair Project Ideas is covered by Education.com's Privacy Policy and site Terms of Use, which include limitations on Education.com's liability.
Warning is hereby given that not all Project Ideas are appropriate for all individuals or in all circumstances. Implementation of any Science Project Idea should be undertaken only in appropriate settings and with appropriate parental or other supervision. Reading and following the safety precautions of all materials used in a project is the sole responsibility of each individual. For further information, consult your state's handbook of Science Safety.
Bread Mold Experiment
There's nothing worse than finding a moldy piece of fruit in the bottom of a bag. Who ever thought that moldy bread would lead to a the development of modern antibiotics? More cultures that you might know used mold to help prevent infection. Poultices of moldy bread were used in ancient Egypt, ancient India, and ancient Greece, and penicillin, an important antibiotic, is derived from mold spores.
Mold spores are everywhere just waiting for the right environment to grow and multiply in. But what is the best environment for them? Is it cold or warm? Sunny or dark? This bread mold experiment will help your child find out, while developing important hypothesis-making and experiment-designing skills.
 Grade Middle School
Subject Science
- Life Science
What You Need:
- 3 pieces of bread
- 3 resealable plastic bags
- Permanent marker
- Water
What You Do:
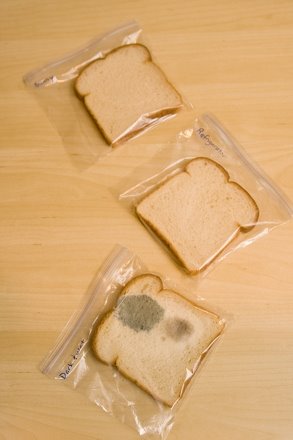
- Put bread in all three bags.
- Take one bag and put it in a dark place. Place the next bag in the refrigerator. Place the last bag in a sunny area. Make sure each bag is sealed tightly. Label them with a marker.
- While you wait for the results, work with your child to develop a hypothesis as to what will happen to each bag of bread. Think about where mold grows naturally. What conditions does your child think are conducive to mold growth in nature?
Check each bag daily to record any changes you see, and compare the results with your child's hypothesis.
Did You Know?
- Different types of mold grow in the dark versus the light, and cold versus warm temperatures.
- All mold is dangerous to eat. If you ever have a slice of moldy bread it is recommended that the whole loaf be thrown out. Mold spores are microscopic and are already all over the entire loaf even if colonies haven’t developed yet.
Find Out Why Leaves Change Color
Of all the natural processes around us, the annual changing of leaves from green to different shades of yellow, orange, and red is perhaps the most beautiful. But behind this show of color, there are important scientific processes at work.
 Want to give your child a peek into the science behind a tree's changing leaves? With this hands-on activity, you'll show how those colors stay hidden in the leaf all year long!
Grade Fifth Grade
Subject Holidays & Seasons
- Fall
- Science
- Life Science
What You Need:
- Leaves
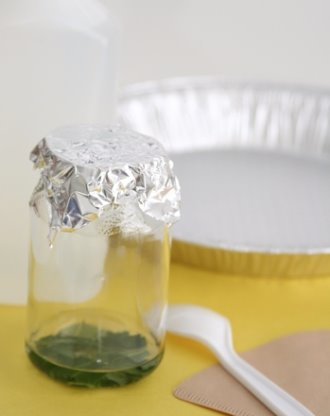
- small jar (a baby food jar work well)
- cover for jars or aluminum foil or plastic wrap
- rubbing alcohol
- paper coffee filter
- shallow pan
- hot tap water
- plastic knife or spoon
What You Do:
- Have your child collect 2-3 large leaves from the same tree type. You and your child should tear or chop the leaves into very small pieces and put them into small jars.
- Add enough rubbing alcohol to the jar to cover the leaves. Using a plastic knife or spoon, carefully chop and grind the leaves in the alcohol. SAFETY NOTE: rubbing alcohol can be harmful if mishandled or misused. Use in a well-ventilated area, and avoid contact with skin.
- Have your child cover the jar very loosely with a lid, plastic wrap or aluminum foil. Place the jar carefully into a shallow tray containing 1 inch of hot tap water.
- Keep the jar in the water for at least a half-hour, longer if needed, until the alcohol has become colored (the darker the better). Twirl the jar gently about every five minutes. Replace the hot water if it cools off.
- Have your child cut a long thin strip of coffee filter paper. Remove the jar from the water and uncovered. Place a strip of filter paper into the jar so that one end is in the alcohol. Bend the other end over the top of the jar and secure it with tape.
- The alcohol will travel up the paper, bringing the colors with it. After 30-90 minutes the colors will travel different distances up the paper as the alcohol evaporates. Your child should be able to see different shades of green, and possibly some yellow, orange or red, depending on the type of leaf.
What happened?
Chlorophyll is a green compound that hides the other colored pigments present in leaves. In the autumn chlorophyll breaks down, allowing the other pigments to be seen. The mix of pigments in a leaf may be separated into bands of color by the technique of paper chromatography. Chromatography involves the separation of mixtures into individual components, which you just did using alcohol and energy (heat). Then, by "absorption" and "capillarity," separation can take place! The paper holds the substances using absorption, while capillarity pulls the substances up the paper at different rates. Pigments are separated on the paper and show up as colored streaks or bands. Pretty cool, huh? As possible extension activities have your child compare different types of leaves and/or experiment with other types of paper.
Homemade Thermometer
Has your child learned about heat energy and temperature measurement in class? He's probably seen a lab thermometer! Make your own homemade thermometer with this hands-on science activity that is a great complement to in-class learning.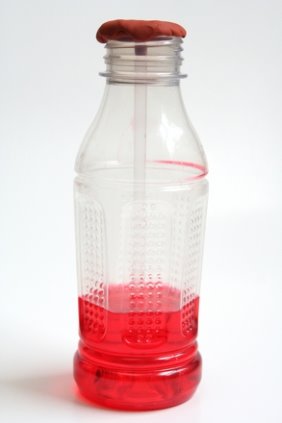
Arts & Crafts
- Construction & Sculpture
Science
- Environmental Science
What You Need:
- Modeling clay
- Red food coloring
- Water
- Clear straw
- Rubbing alcohol
- 11 ounce narrow-neck, clear plastic bottle
- Thermometer (optional)
- What You Do:
- Pour equal amounts of tap water and rubbing alcohol into the bottle until it's a quarter full.
- Add a few drops of red food coloring, and shake the bottle to mix it.
- Insert the straw into the bottle, not letting it sink to the bottom.
- Wrap modeling clay around part of the straw and the opening of the bottle to make it stay. Let part of the straw stick out of the bottle. The clay should be tight around the straw and cover the bottle mouth, but make sure to leave the top opening of the straw uncovered.
- Test the thermometer! Have your child put her hands around the bottle. What happens to the mixture when her warm hands are on it?
You can also put the thermometer outside and see how the contraption reacts to the hot or cold temperature. Or, place the thermomter in a bowl of hot water and then put it immediately in the freezer. What happens?
What's Going On?
When the alcohol and water mixture gets hot, the mixture expands, sending the water up the straw. How hot would it have to be for the water to come out of the straw?
Challenge your child to make a scale for the thermometer. Ask your child to use a store bought thermometer to identify the temperature that the area where the homemade thermometer mixture is. Put a line on the straw where the liquid is, and mark the temperature that the thermometer says. Do this in various cold and hot places in the house.
Keep a Candle Burning Underwater!
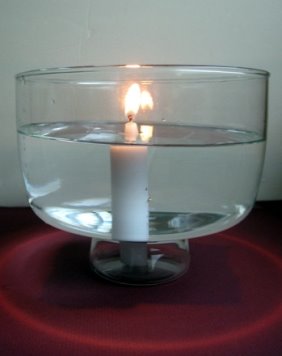
Magic tricks can't hold a candle to this scientific triumph! Watch your child's astonishment as he sees that he can make a candle burn below water, and create a very bizarre candle souvenir. With just the open flame above the water's surface, this process will transform the candle to a hollow tube of wax. The water surrounding the candle is the secret to this "trick"! It keeps the exterior of the candle at a cool temperature, so the area touching the water never melts!
Grade Fifth Grade
Subject Science
- Physical Science
What You Need:
- Taper candle
- Large bowl
- Duct tape
- Cigarette lighter or candle
- Cold water
- Scissors
What You Do:
- Have your child cut off four 4” lengths of duct tape.
- Invite him to fasten the candle to the bottom of the bowl with duct tape.
- Help him fill the bowl with water just to the top of the candle. Be careful not to submerge the wick!
- Light the candle for your child. Instruct him to be careful of the open flame!
- Encourage your child to observe what happens. The candle should burn all the way to the bottom of the bowl, leaving a thin tube of wax.
What Happened?
If you had lit and burned the candle in a waterless bowl, it would have burned normally and eventually consumed the whole candle. This is caused by the action of both heat flow and a high temperature. Get your child thinking: Why did the candle burn differently when he added water to the bowl? It only seems like magic that the candle burned while it was underwater!
Water has the amazing quality of absorbing heat energy, and because you used cold water, even more heat energy was absorbed. Once the candle's heat energy dissipated into the water, the heat had much less impact on the outer surface of the candle, resulting in the candle's strange transformation.
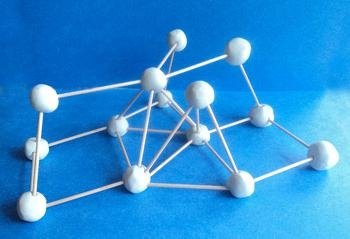
Make a Molecule
Got a young scientist at home? Try this project with him! Molecules are made up of atoms that are stuck together in a particular shape or form. Create your own molecule design with this home-made clay recipe and toothpicks!
 Grade Middle School
Subject Arts & Crafts
- Construction & Sculpture
Science
- Chemistry
What You Need:
- Cornstarch clay (baking soda, cornstarch, water)
- Toothpicks
What You Do:
- Mix 1 cup baking soda, 1/2 cup cornstarch, and 2/3 cup of water in a saucepan. Have a grown-up help you cook the mixture on the stove over medium heat, stirring constantly, until it resembles mashed potatoes. Remove from the stove and let cool.
- Once the mixture is cool enough to handle, help your child knead the clay on your work surface, adding more cornstarch if necessary to make the clay soft.
- Have your child form the clay into small balls. They should be a bit bigger than the size of a pea. Make sure you make at least 10 small balls of clay that you will need to build your molecule design.
- Using your toothpicks, begin building your molecule. Stick the toothpicks into your clay - about 1 cm in.
- Continue adding toothpicks and clay balls as needed to build your molecule shape.
- Once your molecule is shaped, carefully place the entire sculpture into a sunny, dry area so that the clay can dry.
- Now your scientist is ready to show his molecule model at the next science fair!
Note: You can also add food coloring your clay to make different colors for your molecule model.
What Does It Matter?
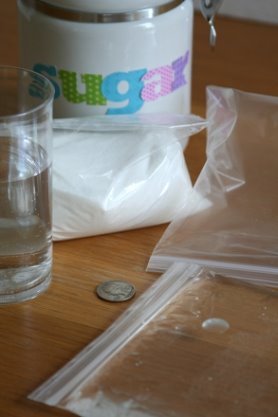
In order to produce sound you need something to vibrate. Matter is that something. It's the “stuff” that the universe is made of. But will all matter transmit sound? Are there only certain particles that can pass these sound waves along? Let's find out.
Grade Middle School
Subject Science
- Physical Science
What You Need:
- 3 plastic sealable bags
- Sand (sugar or flour can be substituted)
- Water
- Coin
What You Do:
- 1. Fill the first bag halfway with sand. Push out the extra air and seal the bag shut.
- 2. Fill a second bag halfway with water. Again, push out the extra air and seal the bag shut. Make sure that it doesn't leak.
- Fill a third bag halfway with air. Seal it and place all three bags on the tabletop.
- Place your ear on the bag of sand. Gently tap a coin on the tabletop. What do you hear?
- Repeat the coin tapping while listening through the bag of water. Does it sound the same? How has the tapping sound changed?
- Repeat the tapping one more time while listening through the bag filled with air. Compare the three sounds.
What Happened?
Sounds are transferred by particles that slam into neighboring particles. Solids contain particles with the closest neighbors. Next comes liquids. Gases have the most spread-out particles. The closer the particles are to each other, the better the sound transmission. That's why the sound that passed through the solid and liquid may have seemed much louder than the sound that passed through the air-filled bag.
Test the Stability of Newspaper Towers
As your young learner studies structures, he may hear that the strongest shape is the triangle. Put this architectural idea to the test by building two different newspaper towers with your child. He'll test and observe each structure's stability—trying his hand at engineering as he explores this important architectural concept. 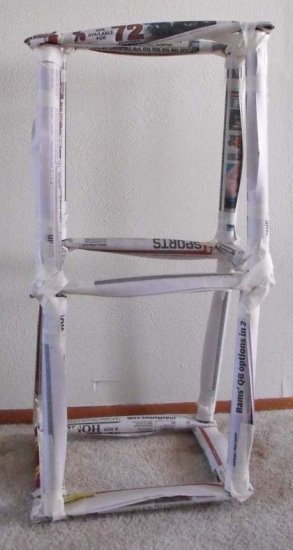
Grade Middle School
Subject Arts & Crafts
- Construction & Sculpture
What You Need:
- Newspapers
- Masking tape
- Heavy desk stapler
- Large paper plate
- Pennies
What You Do:
- Your child will be building two towers, one made out of cubes (horizontals and verticals) and the other consisting of triangles (cubes with diagonal braces). Each tower will be two cubes tall. Start by helping your child roll newspaper into tubes. Take one sheet of newspaper, folded so that you see one full page. Roll from a short side, making a tube approximately one inch thick. Tape. Make 20 for each tower.
- Using staples and tape, help your child make a cube.Take 8 more newspaper tubes, and build a second cube on top of the first. Reinforce the joints with tape. You have completed one tower, two cubes tall.
- Repeat step 2 to build the second tower.
- The braces are also of rolled newspaper but need to be slightly longer than the original tubes. Take one sheet of newspaper, fold it so that you see one page and fold this page in half, top to bottom. Roll from one corner to other and tape to complete the brace. Repeat to make 11 braces.
- Staple or tape one of these braces diagonally across each side, the top and the base of the bottom cube in the second tower. Repeat the process with the four sides and the top of the upper cube.
- Do they both stand easily? It may take some shifting to get the one without braces to remain upright.
- Place a paper plate on each tower. Add pennies until one tower topples. Which one turned out to be strongest? Why does he think that's the case?
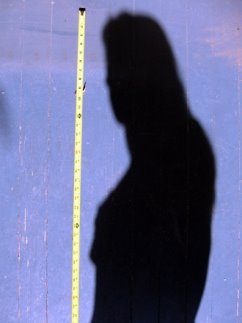
Impossible Heights: Calculate and Measure with Your Shadow!
Everywhere you go, your shadow follows, but it can be much more than a companion or a silhouette: on a sunny day, your shadow can be used to discover the heights of structures that tower over you.
Here's an activity that can turn a gorgeous day into a memorable one with this hands-on lesson in mathematics. By using the concept of proportion, your child will learn fundamental math skills and experience how math can be applied in practical ways to the world around her.
 What You Need:
Tape measure
Notebook
Calculator
Pen or pencil
What You Do:
1. Go to a sunny spot outside where you can clearly see your shadow. This is easiest if done earlier or later in the day when the sun is not directly overhead.
2. Using the tape measure, calculate your shadow in inches from the toes to the top of the head. Record this number in a notebook.
3. Using the tape measure again, measure your actual height in inches. Record this number in your notebook.
4 . Divide your height by the length of your shadow and write that number down. This is the proportion, and you'll need to use in step 7.
5. Locate an object that is too tall to measure, but not so tall that you can't see its entire shadow. A few good examples of this are a basketball hoop, tree, or flagpole.
6. Measure the object's shadow in inches and record the number in your notebook.
7. Multiply the length of the object's shadow by the proportion from step 4 . This will tell you the object's height in inches. Divide by 12 to find the object's height in feet.
Note: This activity should be done within about twenty minutes, so the sun doesn't move significantly in the sky. If you and your child continue the activity, just make sure to measure your child's shadow again and recalculate the proportion.
День детектива
Легенда: Пропав один з учасників табору. Є версія, що він викрадений. Необхідно його знайти. Вожаті попередньо замикають одного з учасників табору в кабінеті і оголошують про його зникнення. Розробляється інструкція, алгоритм дій з пошуку зниклого учасника. Перед початком пошуку кожен загін отримує першу записку. Кожна наступна записка видається в пункті прибуття за інструкцією. Загін, швидше за всіх знайшов зниклого учасника, отримує приз. Маршрути для загонів розробляються різні.
Варіант записок (маршруту) для загону:
1.Gordeeva Lera was the last who saw Vanya. Ask her where and when she saw him. Write the answer in English.
2. Call Vanya's mum. The telephone number is__________( вказується телефон одного з вихователів). Mother's name is Tatyana Ivanovna. Ask her if Vanya is at home.
3. Go to the doctor and ask her if Vanya came to her.
4. Nadezhda Nikolaevna saw Vanya at breakfast time. Find and ask her where she saw him. Find the boys of 7A form ask them if Vanya is watering flowerbeds (7А клас працює на пришкільній ділянці і поливає город). The next task is on the sports ground.
5. Find the person in a red jacket.
6. Ask the person in a red jacket if he/she knows where Vanya is_________( людина називає місце розташування зниклого хлопчика, але потрібно знайти ключ від кабінету, де він знаходиться). 7. The key is in the place where children play basketball (ключ знаходиться під кущем акації, необхідно його відшукати і звільнити бранця з неволі).
https://hubpages.com/education/Fingerprint-Classification-Project
Fingerprint Classification Project
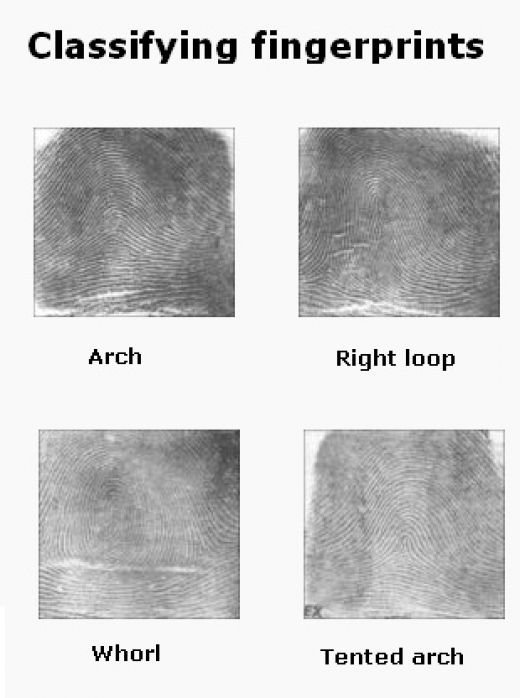
Photo: bistra1,Flickr
Fingerprint classification is a great science project for kids. Follow these instructions for a great lesson on fingerprinting and the scientific method. This project is great for giftedor older elementary students or for middle school students.
The Question - Can We Devise a System to Classify Fingerprints?
Scientific study requires the collection of large amounts of data, which must be organized in order to be useful. But even kids can come up with useful systems of classification.
Fingerprint Facts:
- The ridge patterns on our finger pads are unique. No two are exactly alike.
- We leave impressions of these ridges on everything we touch with any pressure.
- Fingerprints can be visible or latent, depending on the substances on our fingers.
- Injuries do not change the ridge structure. New skin always grows in the same pattern.
- Dactyloscopy is the practice of using fingerprints for identification.
Classification
Fingerprints are classified by patterns, sizes, and by the position of the patterns on the finger. By using the skills of observation, comparing and contrasting, and classification, students can devise their own system for organizing fingerprint samples.
Materials Needed:
- 3x5 index cards
- pencils
- pencil sharpener
- transparent tape (3/4-inch if you can get it)
- good lighting
- magnifying glass
How to Take Fingerprints
- Old school: rubber-stamp ink pads. Watch out for damage to clothing and surroundings.
- Practical: rub pencil all over a small area of paper or index card to make an "ink" pad, press fingers onto the penciled area, lift prints from fingers with transparent tape, and stick tape to white index cards.
In order to use fingerprints to solve crimes, you have to have a way to name and sort them. Then you have to find matching prints to the one you find at a crime scene. The FBI has over 200 million prints on file. Do you think they are able to look at every single one to find a match?
The Procedure:
- Separate kids into groups of 4-6.
- They are going to take prints of their thumbs and index fingers to compare.
- You want to make prints not of their tips of fingers but of the pads near the joint crease. That's where the most interesting and distinct patterns are.
- Make sure to label fingerprints with "L" or "R" for left or right hand and "T" or "I" for thumb or index finger.
- Take prints until you get something clear enough to see the pattern.
- After all prints are made and labeled, have partners in each group compare their prints for similarities and differences.
Questions to Explore:
- Are the two prints from the same hand more alike than prints from different people? How?
- What kinds of patterns do they see? (Let them identify patterns they notice before giving them a handout with examples of "official" names for patterns (loops, whorls, and arches).
- What are the positions of those patterns on the finger?
- In which direction do the loops curve-toward the thumb or toward the pinkie finger?
- Compare the size of those patterns.
- Count how many ridges make up a loop.
- Ask which is the most common pattern.
- Present results in graphs, fractions, or percentages.
Conclusion
Go over the original question with kids again. How can fingerprints be classified? Talk about how classification could make it easier to match one print against a database of many. If you have time, you could even create a mock crime scene with a single print from one of your group and time participants while they find a match by examining every single print.
All About Fingerprints
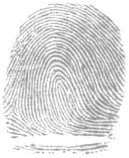
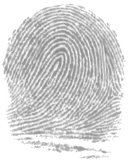
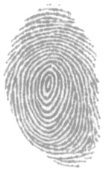
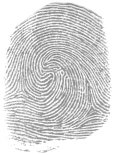
Fingerprint Lingo:
Whorls: circular or spiral in shape
Arches: mound-like contour (tented arches have a spike appearance)
Loops: concentric hairpin or staple-shaped ridges
Radial: loops toward the thumb
Ulnar: loops slope toward the little finger side of the hand
Fingerprint Stats:
Loops make up about 65 percent of the total fingerprint patterns. Whorls account for about 30 percent. Arches and tented arches are the most rare, together constituting only about 5 percent of fingerprints. The ulnar loop is the most common pattern of all fingerprints.
Latent Fingerprinting
A latent fingerprint is one that is left of the scene of a crime (as opposed to one collected with ink). The ridge structure must be reproduced from on an object in where it was left in sweat, oily secretions, or other substances present on the culprit's fingers. Most latent prints are invisible to the naked eye and must made visible, then preserved, analyzed, and compared. Fingerprints are brushed with special powders containing chalk or lampblack and other agents. They can then be photographed or lifted with tape.
Fingerprints are impressions made by the papillary ridges on the ends our fingers. Because these ridges are unique to every human being and do not change with growth or age, they make an ideal form of identification. The practice of using fingerprints as identification is called dactyloscopy. It is an indispensable tool for modern law enforcement. This article is all about fingerprints and how they are used for identification and investigation. Kids will love to learn about fingerprints.
What is the Purpose of Your Fingerprint?
Papillary ridges stick out from the skin of the fingertips. They remain unaffected by superficial burns, abrasions, or cuts and their original pattern continues with each new layer of skin that grows. These ridges allow you to grasp objects. Without the friction they provide, items would routinely slip from your hands. Their use as identification is just an added benefit.
A Short History of Fingerprints
While any ridged area of the hand or foot is unique and may be used as identification, finger impressions are preferred because they are easy to capture and classify. Fingerprint ridges form basic shapes of arches, loops, and whorls. These were identified by Sir Francis Galton and Sir Edward R. Henry in the first fingerprint classification system, known as the Galton-Henry System in 1900.
The Galton-Henry system was widely adopted law-enforcement agencies in the English-speaking world and continues today as the most widely used method of fingerprint classification. Juan Vucetich devised an alternative system known as the Dactiloscopía Comparada, which is still used in most Spanish-speaking countries.
Fingerprint Classification
Fingerprints are classified in a three-way process: by the shapes and contours of individual patterns, by noting the finger positions of the pattern types, and by relative size, determined by counting the ridges in loops and by tracing the ridges in whorls. The information obtained in this way is incorporated in a concise formula, which is known as the individual's fingerprint classification.
Eight Patterns of Fingerprints Recognized by the FBI:
- radial loop
- ulnar loop
- double loop
- central pocket loop
- plain arch
- tented arch
- plain whorl
- accidental
See Also:
Fingerprint Science Project For Kids
Application For Fingerprints By the FBI and Law Enforcement
How to Create a Fingerprint Science Fair Project
Fingerprinting Your Kids at School
All About Fingerprints
Fingerprint Classification Project
When I Grow Up: Jobs With the FBI
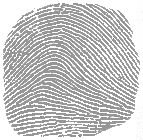
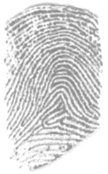
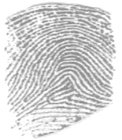
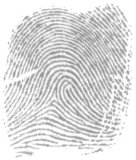
Fingerprint Patterns
|
Left-leaning loop |
Right-leaning loop |
Whorl |
|
|
|
|
|
Double loop |
Double loop with central pocket |
|
|
|

|
Plain arch |
Tented arch |
Arch with loop & scar |
|
|
|
|

Objectives
Concepts:
- Many areas of scientific study involve the collection of large amounts of data. Such data must be organized in order to be useful.
- Even the youngest scientists can invent useful systems of classification.
Facts:
- The patterns of ridges on our finger pads are unique: no two individuals—even identical twins—have fingerprints that are exactly alike.
- We leave impressions—or prints—of these patterns on everything we touch with any pressure.
- The prints can be visible, as when our fingers are dirty or oily, or they can be latent, as when they are made only by the sweat that is always present on our finger ridges.
- Injuries such as burns or scrapes will not change the ridge structure: when new skin grows in, the same pattern will come back.
- Dactyloscopy is the practice of using fingerprints to identify someone.
Principles:
Skills:
Materials:
|
|
|
|

Methods:
There are three methods you can use for taking prints:
- Not recommended: actual rubber-stamp ink pads—too much damage to clothing and surroundings likely
- Easiest and cheapest: rubbing pencil all over a small area of paper or index card to make an “ink” pad, pressing fingers onto the penciled area, lifting prints from fingers with transparent tape, and sticking tape to white index cards for reading
- High-tech, neat, and not too expensive: using purchased Identiprint materials.
Identiprint is a commercial system used by retail merchants to put customers’ thumbprints on the backs of their checks without making an inky mess. Special “ink” pads and self-stick labels take a dark, clear print without leaving any visible residue on the thumb. I found supplies by searching the Web for “Identiprint.” A dealer took a telephone order for a roll of 500 labels and a dozen pads, at a cost of less than $35 in 10/97, which I received some ten days later. You may also ask a high-volume retail merchant near you to donate a small supply for classroom use. Experimentation has shown us, however, that the pencil method is actually easier to use—if harder to read.
Preparation
Room Preparation
Very little: have desks or tables to work at and good lighting
Safety Precautions
None—unless you choose to use regular ink pads! In that case, have soap and water and washcloths on hand for clean-ups and expect a mess, as ink will get onto faces, clothing, and surfaces. Hydrogen peroxide may help to save clothing.
Procedures and Activity
Introduction
Ask the guiding question: Can we invent a way to classify fingerprints?
If you want to use fingerprints to solve crimes, you must have a way to describe and sort and find prints that are similar to the one you find at a crime scene. The FBI has over 200 million prints on file; they can’t look through every single one to find a match!
Today we are going to look at some of our fingerprints and see how we might sort them into categories, just as fingerprint specialists do.
Activity
- Divide participants into groups of 2-6
- If using graphite pads, have everyone rub a pencil over the central part of an index card until it is covered with graphite.
- Give everyone another card for recording his/her prints and have them write their names on the lined side and turn it over.
- If using Identiprint, put two stickers on each card.
- Each participant will be making prints of the index finger and the middle finger of the same hand. Begin by asking who is right- or left-handed and tell them to use that hand.
- Note to participants that they want to make prints not of their fingertips but of the pads of their fingers, near the joint crease, because that is where the most interesting patterns are.
- If using Identiprint, printmaking is best done with a partner: Roll the pad of your finger very gently on the “ink” pad and then let your partner roll it slowly and very gently on the label. This is most easily done right at the edge of your table or desk. You do not need to press hard at all; if you do, you will get a black smudge with very little readable pattern. You can do the whole procedure yourself, but it usually comes out clearer with a partner’s help.
- If using graphite pads, press and roll your finger firmly on the penciled area, then stick a short piece of tape to the finger pad area, pressing down thoroughly, remove the tape and press it onto your print record card.
- Immediately label your print “L” or “R” for left or right hand and “I” or “M” for index or middle finger.
- Repeat procedure for the second finger. Do it over until you get two good prints.
-
After all prints are made and labeled, have partners in each group compare their prints for similarities and differences.
- Are the two prints from the same hand more alike than prints from different people? How?
- What kinds of patterns do they see? Help them give names to the patterns (circles, triangles, curvy lines)
- After some time, give them the handout with examples of “official” names for patterns (loops, whorls, and arches).
- What are the positions of those patterns on the finger (how close they are to the joint line)?
- In which direction do the loops curve—toward the thumb or toward the pinkie finger? (Remember that taped prints are like looking at your finger palm-up and inked prints are mirror images. It may be easier to ask whether they curve toward the right or left of the card.)
- Compare the size of those patterns (such as how many ridges make up a loop).
Note that, while scars, such as the white line on one of the sample prints in this lesson, are the easiest patterns to see, they cannot be used either for classification or identification. They are not unique in the way that ridge patterns are, and they also change over time—making them unreliable for these purposes.
- Divide the participants up by patterns, either grouping them physically or grouping their cards by pattern.
- Ask how you might look most efficiently for a particular pattern. For example: “In which of these groups would I look for a loop that leans to the left? Would it make sense to look through the whorls?”
- Which is the most common pattern? You may wish to graph results, or to figure fractional or percentage representation of each type.

Evaluation
Closing - Original Question
Ask again:
- How can fingerprints be classified?
- How would classification make it easier to match one print against a database of many?
Look for evidence of a plan to search systematically: for example, to look through the left-leaning loops with eight ridges that are close to the finger joint.
Final Note: Fingerprints are a very personal kind of information; let participants take their prints home with them.
Extension Ideas
If you have time, there are many ways to further investigate both fingerprints and classification.
- You can create a mock “crime scene” with a single print from one of your group and time participants while they find a match by examining every single print. Then duplicate another mystery print and your complete database of prints for teams. First, let them take as long as they like to classify the prints, and then time them again to see who can find a match for the mystery print most quickly using their classification system. How do their systems vary and why would some be more efficient than others?.
- Investigate differences: does age, sex, or race seem to predict type of pattern? Children can compare their prints to those of siblings and parents for evidence of hereditary influence.
- Compare finger and toe prints. Investigate pet bird toe prints.
- If children can bring in ceremonial birth certificates with their own footprints, how do they compare to their present-day footprints?
There are many sites on the Web related to fingerprinting. Here are a few:
- More on fingerprint classification
- See Ed German’s Latent Print Examination site, including lots of news and interesting related links, plus his Frequently Asked Questions, including whether fingerprints are inherited
- Fingerprint FAQ’s (frequently asked questions, referred to above) - tailored for elementary students, John Q. Public, police officers, and criminals
- See the on-line History of Fingerprints
- Alternate Handout: the FBI’s two-page introduction to Fingerprint Identification, including clear images of eight pattern types, is available as a PDF file at www.fbi.gov/hq/cjisd/ident.pdf
- For extensive technical information, see the FBI’s on-line Handbook of Forensic Services
- Download the FBI’s Latent Print Processing Guide 2000 (70 pages!) in PDF form — also very technical!
Careers Related to Lesson Topic
- Police officer, detective, and special agent
- Private detective or investigator
- Fire inspector
- Lawyer or judge
Prerequisite Vocabulary
Classify
To sort into groups by likenesses and differences
Latent
Present and not able to be seen but capable of becoming visible. Used to describe fingerprints that are not visible until they are dusted with chalk or other powders, or until they are lit with a laser
Visible
Capable of being seen by the eye without help
День води
День води проводиться в спекотний сонячний день на спортивному майданчику школи. Попередньо готується реквізит для конкурсів: заповнюються водою повітряні кулі (близько 30 шт.), Пластикові пляшки з отворами в кришках. Завершує захід конкурс музичних фонтанів. Діти приносять змінний одяг, т. К. Зазвичай сильно промокають. Це свято користується надзвичайною популярністю в таборі. Конкурси з водою (дві-три команди):
water-running - за допомогою склянки наповнити водою пляшку, яка знаходиться на деякій відстані. Учасники виконують завдання один за іншим з перев’язаними ногами;
water-ball - перекидання кулі з водою двома учасниками поперемінно, поки куля не впаде і не лопне;
water-crocodile - учасник стоїть на руках (горизонтально), інший тримає його ноги. Необхідно перенести стакан з водою на спині, пересуваючись на руках;
water-jumping - пропригать на одній нозі з двома склянками води;
water-basketball - кидання кулі з водою в баскетбольну корзину;
water-shooting - потрапляння кулею з водою в мішень;
water-bowling - катання куль з водою по майданчику (хто далі);
water-cannon - учасник стрибає на пляшку з водою, кришка якої трохи рас¬кручена. Від удару струмінь води б'є з пляшки на певну відстань. Чия струмінь вистрілить далі - той і переміг;
fountains competition - конкурс фонтанів з використанням пляшок і куль з водою під музику; беруть участь всі члени загону.
Підраховуються всі бали учасників з усіх конкурсів, а також підводяться підсумки конкурсу фонтанів, виявляється загін-переможець.
СЦЕНАРІЙ конкурсу "Євробачення"
Leading: Ladies and gentlemen! We are opening a great ceremony of the English Camp Eurovision Song Contest. The best singers and the parodists will show us their skills in singing in English.
The rules of the contest are:
all songs are sung live;
the songs could be sung only in English;
no time limits of the songs;
no limits of the performers on the stage;
people on the stage are of age from 7 till 17;
the song can be popular;
nations are not allowed to vote for their own song.
Well, friends! We are beginning our programme.
The first parodists are Ekaterina Matveeva and Olga Stepanova. They represent a parody to the song "Energy".
Maria Ivanova, Svetlana Lipova and Sergey Smirnov will sing a song "Under the sea".
Let me introduce Anton Sergeev with his parody to the song "Sponge Bob".
Daria Ivanova and Valeria Kirilova will sing a song "Hello, hello!".
The next song won Eurovision Song Contest in 2008 and Nikita Korneev will parody it now.
Alexander Dorofeev represents the funny song "Gummy bear".
In 2009 year Alexander Rybak won Eurovision. Let me introduce Alexander Borovsky with a parody to this song.
Alena Bolshakova represents the song "Top of the world".
Olga Koroleva presents a parody to the song "Hot' n 'Cold".
Marina Alekseeva will sing a song "Fly to your heart".
Tatiana Gerasimova will parody Rihanna with her song "Umbrella".
Let me introduce Elena Maximova with her song "Once upon a December".
Let me introduce parodists Irina Markova and Sergey Vlasov. They present the song "July".
Let me introduce Arina Vesnina and Anna Kolyaso with a parody to the song "Sun is up".
And Margarita Sokolova will sing a song "Scooby Doo". Her dog Knopa will play the role of Scooby Doo.
Elena Maximova will sing again a parody to the song "California".
Olga Nazarova and Tatiana Rodionova present a parody to the song "Single lady".
Our contest comes to an end. Now it's time to choose the best singer of the English Camp!
Our jury begins it's work.
про публікацію авторської розробки
Додати розробку