STEM Camp “Environmental protection” day 3 of 5 "Math day: How much energy does school need? Solar power."
3-ій день СТЕМ табору з англійської мови присвячений математиці. Учні розрахують скільки енергії використовує їх кабінет, школа, як можно скоротити витрати та познайомляться з сонячною енергією, побудувавши сонячну духову піч.
5-days school STEM Camp
for children 7-8th form
“Environmental protection”
3rd day: Math day: How much energy does school need? Solar power.
Мета: викликати в учнів бажання дізнаватися нове, виховувати дбайливе ставлення до навколишнього середовища, природних ресурсів, ознайомити з альтернативними видами енергії, розвивати логічне мислення, вміння працювати у команді, швидкість реакцій.
Обладнання: приладдя для експерименту
Хід роботи:
- Привітання. Організаційний момент. Ознайомлення з планом роботи СТЕМ табору на третій день.
- Перша частина сьогоднішнього завдання – це визначення кількості енергій необхідної для нашої шкільної кімнати.
Each day we are surrounded with and use many fantastic technologies. While not always obvious, these technologies require energy to operate. This energy use can add up in terms of monthly power bills as well as the natural resources required to produce that power off site. Numerous energy efficient tools exist today to help us conserve resources and reduce our monthly payments. This experiments helps you identify what is using energy in our classroom and encourages you to brainstorm strategies for your school to reduce its consumption and monthly fees.
Research Questions
- Does your classroom use much energy during the day?
- What items need energy or power in your classroom?
- If your school wanted to save money on their monthly electricity bills, what could they do?
What to do:
- Select a classroom in your school to use for this experiment.
- Using the graph paper and pencil, draw the walls of your classroom. Mark where any doors or windows are located.
- Clor to mark anywhere there is a power cord plugged into the wall.
- Llabel the drawing ‘Ceiling’.
- Examine the entire ceiling and identify any objects that require energy to operate (including lights and overhead projectors). Mark these on your graph paper.
- Sit back and examine your drawings.
- Now let’s count how much energy do we consume?
- How much does it cost?
Author: Alexa Bach McElrone https://www.education.com/science-fair/article/mapping-energy-use/?source=related_materials&order=6
“How to Make a Solar Oven”
There are lots of great reasons to learn how to make a solar oven! Maybe you’re going camping. Maybe you’re interested in learning about different ways to concentrate the sun’s energy. Maybe you’re interested in methods of cooking that don’t add greenhouse gasses to the atmosphere. Maybe you’re just hungry! In any case, as long as you’re patient and willing to move your oven where the sun is, you’ll be rewarded with some hot, yummy food.
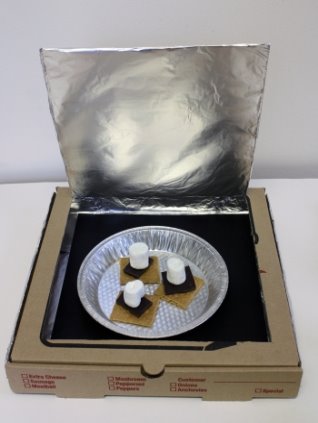
Several scientific phenomena are involved in making your oven the best heater it can be. Heat is the form of energy (sometimes called thermal energy) that is transferred by a difference in temperature. You want to transfer the sun’s heat to your solar over. Reflectionis the throwing back of light, heat or sound by a body or surface, like a mirror. The shiny foil you’ll use in your oven will reflect the sun’s light and heat inside your oven. During absorbtion, energy is taken into a material rather than reflected. You will line the inside of your oven with black paper so it can absorb the light and heat being reflected into it. Another energy process you should be familiar with for this project is convection, which is the transfer of heat by the movement of a gas or liquid. You’ll use plastic wrap to make your oven airtight so the air warmed by the sun doesn’t leave your oven through convection. One final energy term important to this project is insulation. Insulating materials prevent heat leaving your oven through radiation. That’s why you are going to line the inside of your oven with a cheap and effective insulator—newspaper!
Materials
- Cardboard pizza box
- Pencil
- Ruler
- Box cutter or scissors
- Aluminum foil
- Clear type of tape
- Black construction paper
- Plastic wrap or large, transparent plastic bag
- Newspapers
- Oven mitten
- Dish or pie plate
- Cooking Ingredients, like those for some mores or nachos
- Optional: a thermometer that goes up to 250 degrees F.
What to do:
- Clean any stray bits of cheese, sauce or crumbs out of your pizza box.
- Using the ruler and pencil, draw a square one inch in from the edges of the top of the box.
- Use the box cutter or knife to cut out three of the four sides of the square.
- Make a crease along the uncut side of the square to create a flap that stands up.
- Cut a piece of aluminum foil large enough to cover the inner side of the cardboard flap.
- Wrap the foil tightly, and secure with tape. What purpose does the foil serve?
- Line the bottom of the pizza box with black construction paper. What purpose does the black paper serve? Would white paper work as well? Why or why not?
- Cut two pieces of plastic wrap that are the same size as the top of the pizza box.
- Use tape to secure the plastic wrap to the inside edges of the square window you cut into the box. You are creating an airtight window. Why do you want to make your oven airtight?
- Roll up some newspaper pages into tubes to stuff into the sides of the box. Make sure you are still able to close the lid of the pizza box. Remember—what purpose does the newspaper serve?
- Now it is time to cook something! The best time to use your oven is between 11 AM and 2 PM. Make sure to set the food on a dish so you don’t mess up the interior of your oven.
Results
On a sunny, warm day, your oven could reach about 200 degrees F. You will notice that food takes longer to cook in a solar oven than a regular one.
Why?
Let’s recap: You covered the flap with foil so that the foil would reflect sunlight into the oven. The black paper on the bottom of your oven absorbed the sun’s energy (white paper would have reflected a lot of that energy). You made your oven airtight so that the warm air inside your oven would not leave the pizza box via convection. You put the newspaper inside your oven to insulate it and prevent heat loss through radiation. It is best to use your oven between 11 AM - 2 PM because that is when the sun’s rays are strongest. If you are making a s’more, it is good idea to have the chocolate on top because its dark color will absorb heat better than the lighter graham crackers. Food takes longer to cook in a solar oven because solar ovens don’t get as hot as conventional ovens. That’s okay for many dishes, and using an educational oven like the one you made yourself adds an extra special taste. (Джерело: https://www.education.com/science-fair/article/design-solar-cooker/?source=related_materials&order=3 )
- Підведення підсумка дня. Програма www.menti.com - створюємо хмаринку слів зі своїх вражень (код 392755).


про публікацію авторської розробки
Додати розробку

